

Creative ways to display your toy collection beautifully
TL;DR:
- Effective toy collection displays prioritize dust protection, UV safeguarding, and strategic arrangement to enhance visual appeal. Choosing enclosed cabinets with proper lighting and risers offers a low-maintenance, secure, and attractive presentation. Regular cleaning, rearranging, and photographing the display help maintain its freshness and prevent unnoticed damage over time.
You spent months tracking down that limited-edition figure, finally scored it, and now it’s sitting in a cardboard box because your shelves are overflowing with dust-coated clutter. Sound familiar? For serious toy collectors, the display itself is half the hobby, yet most setups end up looking more like storage than showcase. This guide walks you through every stage of building a display that protects your pieces, highlights their best features, and actually makes you happy every time you walk into the room.
Table of Contents
- What you need to get started
- Step-by-step: Setting up your display
- Troubleshooting and common mistakes to avoid
- Verifying your results and keeping your display looking great
- A collector’s perspective: Why simplicity wins over complex setups
- Bring your toy display vision to life with ToylandEU
- Frequently asked questions
Key Takeaways
| Point | Details |
|---|---|
| Enclosed displays protect best | Glass or acrylic cabinets significantly cut down on dust and damage risk. |
| Tiered stands improve visibility | Small collectibles stand out when elevated instead of blending into shelves. |
| UV protection matters | Use UV-filtering glass or film to prevent fading of cherished toys. |
| Rotate and refresh regularly | Rotating displays and performing routine checks keep the setup looking fresh. |
| Simplicity beats complexity | A well-organized, uncluttered display delivers more impact and less stress. |
What you need to get started
Once you appreciate the importance of a thoughtfully displayed collection, the next step is to prepare and gather all the materials you’ll need.
Before buying a single shelf bracket or LED strip, take stock of what you actually own. Lay everything out, measure the tallest and widest pieces, and group items by size, theme, or series. This simple inventory step prevents the most common beginner mistake: buying display furniture that’s too shallow for your figures or too short for boxed items. A spreadsheet or even a handwritten list works fine here.
The two big display categories you need to understand:
- Open shelving: Accessible, affordable, and visually open. Great for large pieces you want to grab often. The trade-off is real: enclosed cabinets reduce dust settling far more effectively than open setups, making enclosed options the smarter choice for rare or fragile pieces.
- Enclosed cabinets: Glass or acrylic fronted cases that block dust, reduce accidental bumps, and provide a polished gallery look. IKEA Detolf cases, custom acrylic boxes, and repurposed display cabinets from furniture stores are all popular options.
Essential checklist before you start:
- Microfiber cloths and compressed air for cleaning
- Risers and tiered stands (acrylic, wood, or foam)
- A measuring tape and level
- Adhesive poster strips or museum putty for stabilizing items
- UV-filtering window film or UV-blocking glass panels
Comparison: Open vs. enclosed display materials
| Feature | Open shelving | Enclosed cabinet |
|---|---|---|
| Dust protection | Low | High |
| UV protection | None (unless film added) | High (UV glass) |
| Accessibility | Instant | Requires opening door |
| Visual impact | Casual | Gallery-quality |
| Maintenance frequency | Weekly | Monthly |
| Cost range | Low to mid | Mid to high |
Pro Tip: If you collect rare or vintage pieces, prioritize UV-filtering glass or film from day one. UV damage to paint, plastic, and cardboard packaging is cumulative and irreversible. It’s far cheaper to protect now than to regret later. For ideas on gifting and displaying toys to make an impression, thinking ahead about presentation always pays off.
Step-by-step: Setting up your display
With your supplies ready, you’re set to bring the vision to life. Here’s a practical guide to building your ideal display, one step at a time.
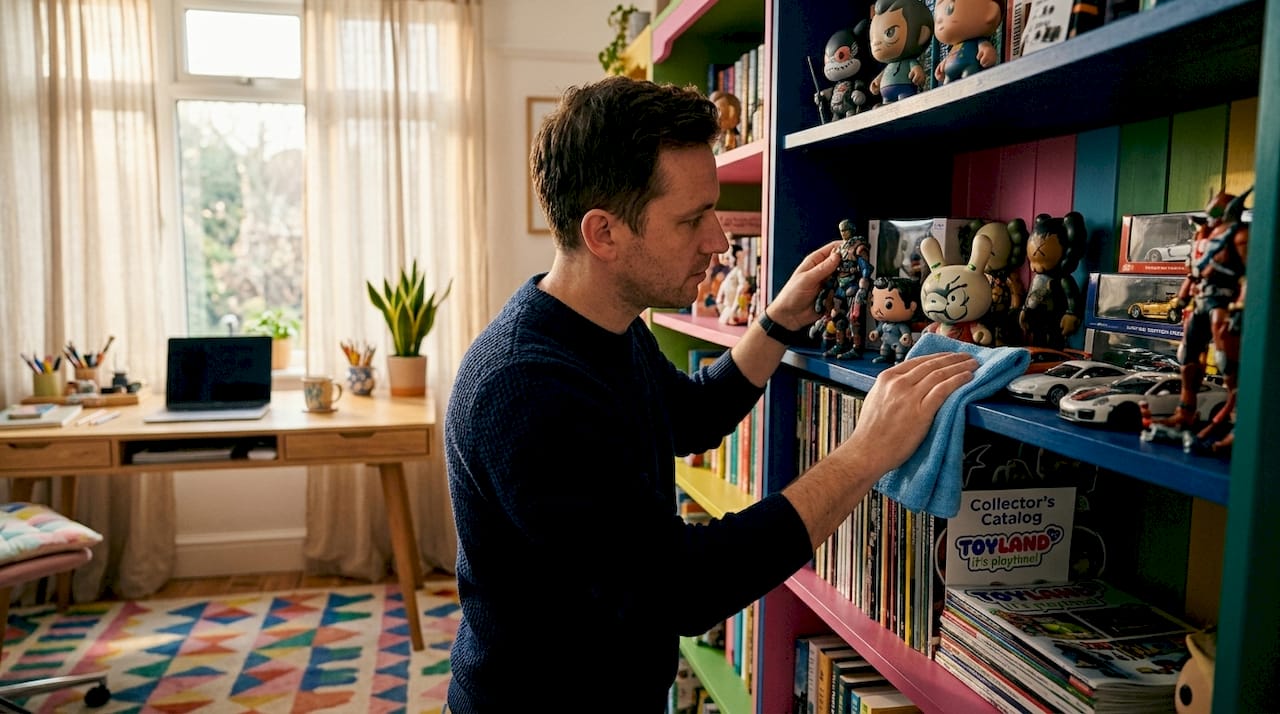
1. Clean your display area thoroughly. Dust all walls, wipe down shelves, and vacuum the floor around the space. Starting with a clean environment means your pieces stay cleaner from day one and you can see the space clearly before placing anything.
2. Plan your layout on paper first. Sketch a rough diagram showing which pieces go where. Group items by height so taller figures sit at the back and shorter ones step forward. Themed groupings (by series, color, or era) create visual coherence that random placement never achieves.
3. Assemble your display furniture. Follow manufacturer instructions carefully, especially for wall-mounted shelves. Use a level religiously. Even a one-degree tilt becomes obvious once items are placed, and you’ll feel it every time you look at the shelf.
4. Add risers and tiered stands. This step transforms flat, boring rows into dynamic displays. Acrylic risers are nearly invisible and let items appear to float. Wooden stepped platforms add warmth. Foam blocks covered in felt work surprisingly well for heavier pieces. Using risers for mini toys is especially important: small items can disappear on flat surfaces without intentional elevation and spacing to keep them visible.
5. Arrange your items, starting with anchors. Place your largest or most prized pieces first. These are your anchors. Build around them with complementary pieces. Leave deliberate breathing room between items. Crowded shelves look chaotic, and individual pieces lose their impact when squeezed together.
6. Add and position your lighting. LED strip lights behind display cases, puck lights under shelves, or small spotlights above cabinets all work well. Warm white (around 2700K) creates a cozy, gallery feel. Cool white (5000K) is better for showing true colors on brightly painted figures. Position lights so they illuminate faces and details, not just the top of heads.
7. Finish with protective steps. Apply museum putty or adhesive strips to the base of any top-heavy figures. Add UV film to nearby windows. Close cabinet doors and inspect the full display from a normal viewing distance. Small adjustments at this stage prevent bigger fixes later.
Open shelving vs. enclosed display: a direct comparison
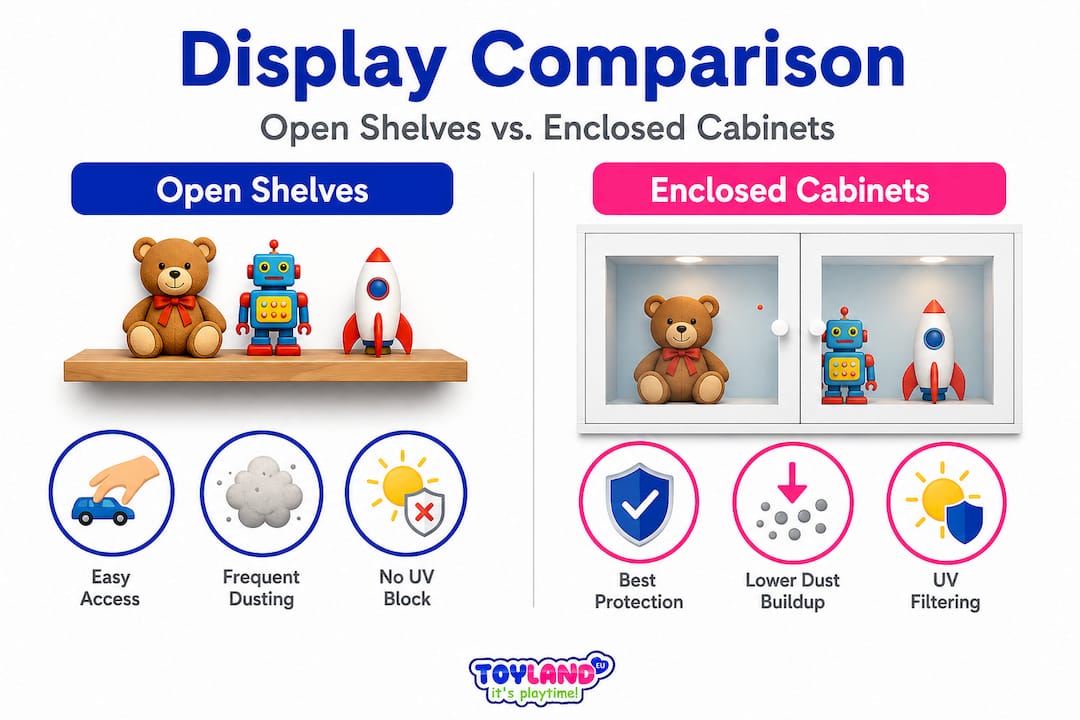
| Factor | Open shelving | Enclosed cabinet |
|---|---|---|
| Dust buildup | Every 1 to 2 weeks | Every 4 to 6 weeks |
| Bump risk | Moderate to high | Very low |
| Visibility of items | Excellent | Excellent with good lighting |
| Setup difficulty | Easy | Moderate |
| Best for | Large, durable items | Rare, fragile, or valuable pieces |
Pro Tip: Space out items more than feels natural at first. The instinct is to fill every inch of available shelf space. Resist it. Empty space between pieces actually makes each item look more important and easier to appreciate, especially for smaller figures or minis that would otherwise blend into a visual blur.
Troubleshooting and common mistakes to avoid
Even the most carefully arranged displays face their issues. Here are common pitfalls and how to prevent or remedy them.
Most collectors run into the same handful of problems, and almost all of them are preventable with a little advance thinking. Here’s what to watch out for:
- Dust buildup on open shelves. If you’re using open shelving, expect to dust at least once every week or two. Open shelving trades aesthetics for higher maintenance, and sealed or enclosed solutions are consistently the better choice for reducing dust and accidental bumps. The fix: add glass or acrylic doors to existing shelves or invest in a proper display case.
- UV fading on exposed pieces. Plastic yellowing and paint fading are the silent killers of toy collections. Items placed near windows, even north-facing ones, receive enough UV exposure over time to cause visible damage. Apply UV window film, use UV-blocking display cases, or relocate prized pieces away from all direct and indirect sunlight.
- Overcrowded layouts. More pieces is not better. A display packed with 50 items where nothing stands out is less impressive than 20 pieces with room to breathe. If you have more than your display can comfortably hold, rotate items rather than cramming everything in at once.
- Top-heavy figures falling. A single fallen figure can damage itself and knock others over in a chain reaction. Use museum putty, acrylic display stands with locking pins, or figures with wide bases to prevent tipping.
- **Choosing display-worthy toys](https://toylandeu.com/blogs/articles/what-makes-a-toy-truly-giftable-how-to-choose-well) from the start saves a lot of rework. Items with strong visual design, interesting colors, and distinctive silhouettes always photograph and display better than generic pieces.
“Protecting your collection isn’t just about looking good today. UV exposure, dust, and accidental damage are cumulative. Every week a valuable piece sits unprotected is a week of irreversible wear. Enclosed displays with UV-filtering glass are the single highest-impact upgrade most collectors never make soon enough.”
A fix many collectors overlook: if you already have open shelving and don’t want to replace it, add a clear acrylic panel across the front edge of each shelf. It’s inexpensive, barely visible, and dramatically reduces the chance of accidental bumps knocking items off.
Verifying your results and keeping your display looking great
Once your display is in place and mistakes are fixed, it’s time to focus on keeping it beautiful and ensuring your collection always feels fresh.
A display that looked stunning on day one can become stale and dusty within months if you don’t build a maintenance rhythm. The good news: upkeep is simple once you have a system.
Your ongoing display maintenance checklist:
- Dust all surfaces using a microfiber cloth or compressed air every two to four weeks. Cabinets need it less, open shelves need it more.
- Check for UV fading by photographing key pieces every few months and comparing. Early fading is easy to miss without a reference photo.
- Inspect shelves and mounting hardware for any looseness or shifting, especially in humid climates where wood can expand and contract.
- Look for hidden figures. Smaller items have a way of getting “eaten” by taller neighbors over time. Scan your display at eye level and at child height to catch pieces that have become invisible from normal viewing angles.
- Rearrange and refresh every three to four months to maintain visual interest. Moving five or six pieces can make the whole display feel new again. Enclosed cabinets reduce dust and environmental exposure, but even closed cases benefit from a periodic wipe-down and rearrangement.
Pro Tip: Rotating display items seasonally is one of the best habits a collector can build. Pull items from storage into your active display each season and rest others. You’ll rediscover pieces you’d forgotten, your display always feels current, and every piece gets equal time in the spotlight.
The verification step most people skip: photograph your full display from your typical viewing position immediately after setting it up. Come back in three months and compare. You’ll quickly spot any fading, tilting, or crowding that crept in gradually. What happens slowly is easy to miss in person but obvious in a side-by-side photo comparison.
A collector’s perspective: Why simplicity wins over complex setups
The toy collecting community is full of elaborate display setups: multi-tier lighting rigs, custom-built wall installations, rotating motorized platforms, color-coded theming down to the wall paint. And honestly, most of those setups look incredible in photos for about six months. Then life happens. Dusting a 12-shelf custom installation stops being fun. The motorized platform breaks. The custom lighting controller needs updating. What started as a passion project becomes a maintenance burden.
The collectors who stay happiest with their displays long-term tend to have simpler setups. Two or three quality enclosed cabinets with good internal lighting. A handful of acrylic risers. Enough empty space that every piece has room to breathe. That’s it.
Open shelving is often the first choice because it’s cheaper and visually accessible, but for genuinely valuable or irreplaceable pieces it’s usually a false economy. The maintenance cost (time, cleaning supplies, and the stress of watching valuable items sit exposed) adds up fast. A well-chosen enclosed cabinet pays for itself in peace of mind within the first year.
Risers are the most underrated tool in any collector’s arsenal. A single three-tier acrylic riser transforms a flat row of figures into a dynamic scene. The visual depth created by different heights tricks the eye into seeing more than is actually there, and each individual piece gets better visibility. This effect works for collecting trends of all types, from blind box figures to RC vehicles to vintage action figures.
The real secret experienced collectors learn over time: a display that’s easy to maintain will always look better than one that requires heroic effort to keep presentable. Choose simplicity, add quality lighting, use enclosed protection for anything valuable, and let the pieces themselves do the talking.
Bring your toy display vision to life with ToylandEU
Your display is only as exciting as the pieces in it, and the best displays grow over time with intentional, visually striking additions.
At ToylandEU, we stock over 30,000 toys that range from display-worthy collectibles to hands-on creative kits. Whether you want to add a conversation-starting centerpiece like the gesture-controlled stunt car to your RC collection or bring something interactive and visually beautiful onto your shelf with the Montessori drawing kit, ToylandEU makes it easy to find pieces that actually deserve a prime spot in your display. Free worldwide shipping means growing your collection doesn’t have to come with complicated logistics. Start browsing and find your next standout piece today.
Frequently asked questions
What is the best way to protect toy collections from dust?
Closed display cabinets with glass or acrylic doors are the most effective way to reduce dust buildup and protect your toys from environmental damage.
How can I keep small collectible toys visible and organized?
Use tiered stands or risers to elevate smaller pieces; tiered stands and intentional spacing are specifically recommended so small items stay visible and don’t disappear behind larger neighbors.
Why should I worry about sunlight and UV exposure for my toys?
UV light causes plastic yellowing and paint fading over time; UV protection for displayed items using UV-filtering glass or window film is the most effective long-term safeguard for valuable pieces.
How often should I rearrange or refresh my display?
Refresh or rearrange your display every three to four months to maintain visual interest, prevent dust from settling unnoticed, and spot early signs of fading or instability.
Are open shelves a good idea for displaying expensive collectibles?
Open shelves offer instant access but open shelving trades visibility for higher maintenance, exposing expensive pieces to dust and accidental damage far more than enclosed cabinet solutions.