

RC Car Maintenance: Essential Checklist for Beginners
Good RC car maintenance comes down to five habits: clean after every run, check your battery, inspect electronics, lubricate moving parts, and look over tires and suspension before each session. Do those consistently and you’ll avoid most of the failures that sideline cars at the worst possible moment.
After each run:
- Brush off dirt and debris from the chassis and body
- Check all visible screws for looseness
- Inspect tires for embedded rocks or cuts
- Remove and store the battery properly
- Wipe down electronics with a dry cloth
Weekly (active use):
- Inspect drivetrain gears and diffs for wear
- Check bearings for grit or roughness
- Re-lubricate pivot points and steering linkages
- Test battery health with a charger or meter
Monthly:
- Full diff teardown and re-grease
- Shock rebuild or oil top-up
- Motor commutator service (brushed motors)
- Replace worn o-rings and body clips
Pro Tip: Before you put the car away after a run, flip it upside down and spin each wheel by hand. A wheel that drags, wobbles, or grinds tells you exactly where to look next time — before it becomes a field failure.
Key Takeaways
Consistent RC car maintenance — cleaning after every run, correct battery storage, proper lubrication, and regular electronics checks — prevents most mechanical failures and keeps vehicles running reliably for years.
| Point | Details |
|---|---|
| Clean after every run | Use a soft brush and compressed air; avoid water on unsealed electronics. |
| LiPo storage voltage | Store packs at 40–60% charge (roughly 3.8V per cell) to prevent capacity loss. |
| Lubrication rules | Use hobby-grade bearing oil and white lithium grease; WD-40 is not a substitute. |
| Maintenance schedule | After-run checks every session; diff re-grease every 20–25 runs; shock rebuilds every 10–15 runs under racing use. |
| Toylandeu™ starter pick | The gesture-controlled stunt car and mini off-road SUV are low-maintenance options with free worldwide shipping. |
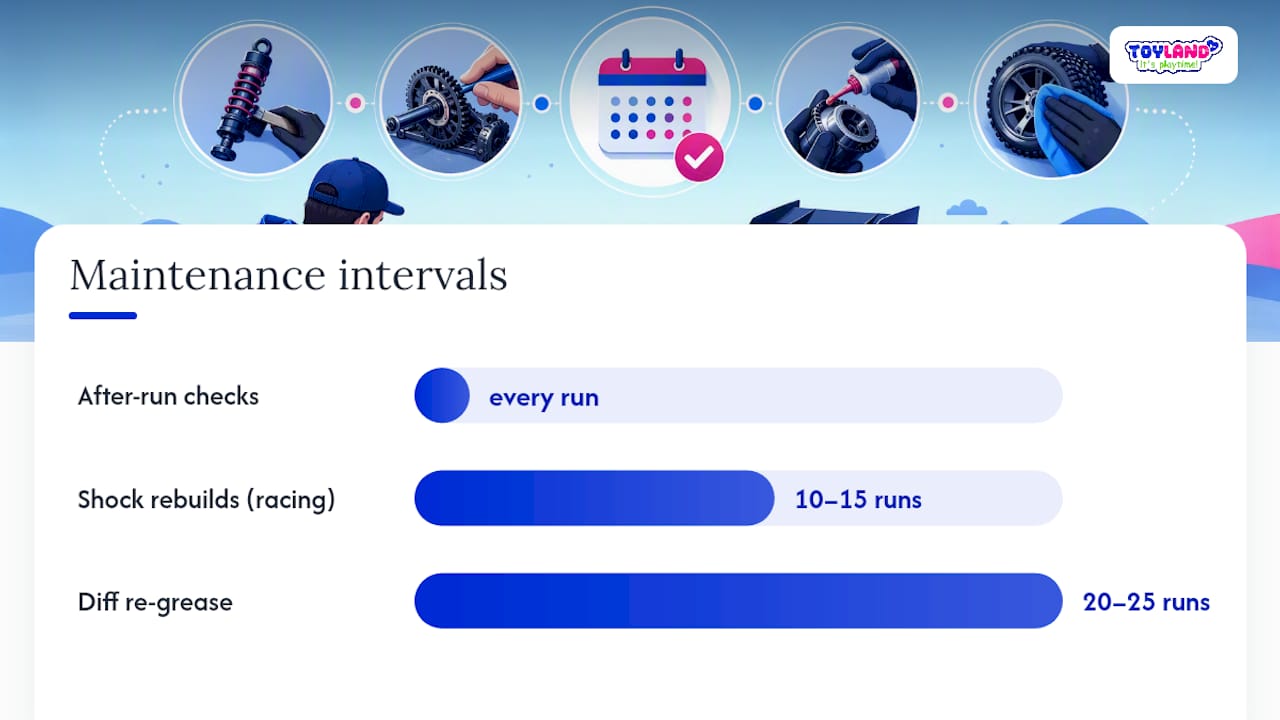
Table of Contents
- Quick Summary
- TL;DR
- How to clean your RC car after every run
- How to maintain brushed and brushless motors
- How to inspect and protect your RC electronics
- Battery care and LiPo safety: what you must know
- Lubrication, bearings, and why WD-40 doesn’t belong in your kit
- How to check tires, wheels, shocks, and suspension
- Post-run checklist and a simple maintenance schedule
- What tools and supplies belong in your RC maintenance kit
- How to set up an RC Safety Circle for safer sessions
- Diagnosing common RC problems at the field
- What most RC maintenance guides get wrong
- Toylandeu™ has the RC cars and starter gear you need
- Sources
- FAQ
Quick Summary
RC car maintenance requires cleaning after every run, proper LiPo battery handling, regular lubrication of bearings and gears, electronics inspection, and periodic shock and diff rebuilds. Following a structured after-run, weekly, and monthly schedule prevents most mechanical failures and extends component life significantly.
TL;DR
- Clean the car after every run; use a soft brush and compressed air on internals
- Store LiPo packs at 40–60% charge on a noncombustible surface
- Use hobby-grade oil on bearings; skip WD-40 entirely
- Inspect shocks, tires, and suspension before each session
- Set up a Safety Circle with cones before running near spectators
Table of Contents
- Cleaning the body, chassis, and drivetrain after runs
- Motor and drivetrain maintenance: brushed vs. brushless
- Electronics: inspection, waterproofing, and connector care
- Battery care and LiPo safety
- Lubrication, bearings, and the WD-40 myth
- Tires, wheels, shocks, and suspension checks
- Post-run checklist and maintenance schedule
- Tools and supplies for your RC maintenance kit
- RC Safety Circle setup for safer sessions
- Common problems and troubleshooting
- Editorial perspective
- How Toylandeu™ can help
- Key Takeaways
- Useful sources
- FAQ
How to clean your RC car after every run
Clean after every run. That’s the single rule that separates cars that last years from cars that need constant repairs. Dirt and grit act as an abrasive inside bearings, diffs, and gear meshes. Mud left to dry locks screws in place and hides cracks. Cleaning after each run, tightening screws, and lubricating moving parts are core steps that extend component life.
What you need:
- Soft-bristle brushes (toothbrush size and larger)
- Compressed air (canned or compressor)
- Mild dish soap or hobby-specific cleaner
- Microfiber cloths
- A small parts tray
Step-by-step cleaning process:
- Remove the body shell and set it aside.
- Pull the battery and store it safely before touching anything else.
- Use compressed air to blow loose dirt out of the chassis, motor bay, and suspension arms.
- Brush the drivetrain, gear covers, and suspension pivots with a stiff hobby brush.
- Rinse the chassis with water only if electronics are sealed or removed — never spray directly at the receiver or ESC.
- Clean the lexan body with a damp sponge and mild soap; avoid solvents, which cloud or crack polycarbonate.
- Dry everything thoroughly with a microfiber cloth and let the car air-dry before reassembly.
- Reinstall the body shell only after the chassis is fully dry.
For the drivetrain specifically, use a soft brush for intricate mechanical sections and a damp cloth with mild detergent for lexan bodies — and avoid running water directly on electronics.
Pro Tip: While cleaning, run your fingers along the axles and driveshafts. Hair and fishing line wrap invisibly around axles and destroy bearings within a few runs. A 10-second feel-check catches it every time.
How to maintain brushed and brushless motors
Service your motor based on run time, not calendar time. A brushed motor running on a dusty track needs attention every few sessions; a brushless motor in the same conditions needs far less internal work but still needs external cleaning and bearing checks. HPI Racing’s maintenance guide covers motor cleaning, differential checks, and specific cleaning tools including motor spray and commutator sticks.
Brushed motor care
Brushed motors wear through carbon brushes that press against a copper commutator. When the commutator gets dirty, you lose power and efficiency fast.
- Remove the motor from the car.
- Spray the motor with dedicated motor cleaner (not WD-40) and let it drain onto a cloth.
- Use a commutator stick to polish the copper surface until it’s bright and smooth.
- Check brush springs for tension; replace brushes when they’re worn short.
- Reinstall and run briefly to seat the brushes before full-power use.
Brushless motor care
Brushless motors have no brushes to wear, but their bearings are the weak point.
- Spray the exterior with motor cleaner to remove dust and carbon deposits.
- Spin the shaft by hand; any roughness or grinding means the bearings need replacement.
- Do not open the motor casing unless you’re replacing bearings — the rotor magnets attract metal particles if left exposed.
- Replace bearings rather than trying to clean sealed ones back to spec.
Drivetrain checks
Spur and pinion gears wear in a predictable pattern: the teeth develop a shiny, rounded profile instead of sharp edges. Check gear mesh by pressing the pinion against the spur with light spring tension — too tight causes heat, too loose causes skipping. Diffs should be re-greased roughly every 20–25 runs under racing conditions; casual bashing can stretch that interval. Drive cups and CVDs crack at the pin holes; spin them and look for wobble.
Pro Tip: After reinstalling a pinion gear, run the car at half throttle for 30 seconds and feel the motor. Warm is fine; hot means the mesh is too tight. Adjust before you strip the spur.
How to inspect and protect your RC electronics
Check electronics before each session and after any run in wet or dusty conditions. A failed receiver or a shorted ESC can send a car into traffic, a wall, or a bystander. Thirty seconds of inspection prevents that.
Quick electronics inspection checklist:
- Antenna: fully extended, not kinked or frayed
- Receiver box: lid sealed, no moisture inside, foam padding intact
- Servo: no gear play, splines tight on the horn, smooth movement through full travel
- ESC: wiring harness not chafed, capacitors not bulging, heat sink clear of debris
- Solder joints: shiny and smooth, not dull or cracked
- Connectors: no bent pins, no corrosion, no loose fit
For waterproofing, coated electronics (servo, ESC, receiver) handle splashes well, but they’re not submersion-proof. Apply dielectric grease to all connectors before wet-weather runs. For cars without factory waterproofing, a small waterproof receiver box and servo tape over ESC vents adds meaningful protection without blocking airflow.
After cleaning with any moisture, wait until the car is fully dry before powering up. When you do power up, run a range check: walk 30 feet away and verify full servo response before driving. Confirm the failsafe is set so the throttle cuts to neutral if signal is lost.
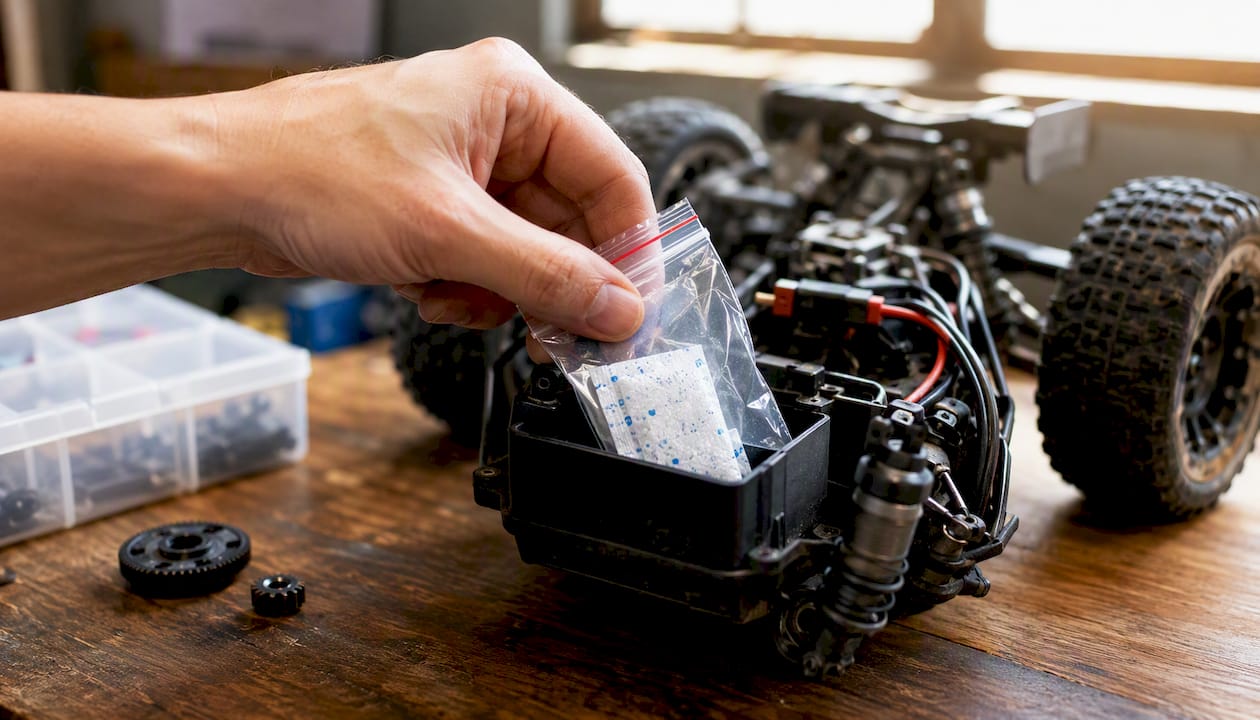
Pro Tip: Keep a small zip-lock bag of silica gel packets in your RC bag. Drop one in the receiver box if you run in humidity or light rain. It costs almost nothing and keeps corrosion off the board.
Battery care and LiPo safety: what you must know
Follow manufacturer charging specs, store packs at storage charge (40–60%), and always charge on a noncombustible surface. Those three rules cover the majority of LiPo incidents. LiPo packs must be charged with LiPo-capable chargers in balance mode, monitored while charging, charged on noncombustible surfaces, and stored at partial charge to reduce fire risk.
Charging best practices
- Use a charger with a dedicated LiPo balance mode — never a NiMH-only charger on a LiPo pack.
- Charge at 1C (1 times the pack’s capacity in amps) unless the manufacturer specifies otherwise.
- Balance charge every session; it equalizes cell voltages and extends pack life.
- Never leave a charging pack unattended. Axial’s RC safety guidelines specifically warn against charging packs while installed in the vehicle.
- Stop charging if the pack gets hot to the touch or swells.
Storage and temperature
Store LiPo packs at 3.8V per cell (roughly 40–60% charge). A fully charged pack sitting on a shelf for weeks degrades faster than one stored at the correct voltage. Keep packs at room temperature; avoid car trunks in summer heat or unheated garages in winter.
NiMH packs are more forgiving: charge at the recommended rate, store partially discharged, and cycle them occasionally to maintain capacity.
Emergency procedures
A swollen (puffed) LiPo is a damaged LiPo. Stop using it immediately. Place it in a fireproof LiPo bag, take it outside, and monitor it for 30 minutes before disposal. Never puncture, bend, or throw a damaged pack in household trash. Many hobby shops and battery retailers accept LiPo packs for safe disposal.
Pro Tip: Designate one spot in your home as the charging station: a ceramic tile on a workbench, away from flammable materials. A fireproof LiPo charging bag adds another layer. The habit matters more than the gear.
Lubrication, bearings, and why WD-40 doesn’t belong in your kit
Use hobby-grade oils and greases matched to the component. Light bearing oil for ball bearings, white lithium or marine grease for gear meshes, and molybdenum-based grease for high-load diff internals. The right lubricant in the right place reduces heat, wear, and noise.
What to use where:
- Ball bearings: thin bearing oil (a single drop per bearing, applied after cleaning)
- Spur/pinion gear mesh: light white lithium grease
- Diff internals: silicone-based diff fluid or moly grease, depending on the diff type
- Steering pivots and hinge pins: light oil or PTFE-based lubricant
- Shock shafts: silicone shock oil (viscosity matched to the shock spec)
Cleaning and re-lubing bearings
Serviceable (open or shielded) bearings can be cleaned with bearing cleaner or isopropyl alcohol, dried with compressed air, and re-oiled. Sealed rubber-shielded bearings are harder to clean effectively; when they feel rough, replacement is usually faster and cheaper than trying to restore them. An ultrasonic cleaner speeds up the process for racers who service bearings frequently.
The WD-40 problem
WD-40 is a water-displacing spray designed for loosening rust and displacing moisture. It is not a long-term lubricant. Applied to RC bearings or motor internals, it washes out existing grease, leaves a thin film that evaporates quickly, and accelerates wear. Use it to free a seized screw or displace water after a wet run — then follow up with proper lubricant.
Pro Tip: After cleaning bearings with solvent, let them dry completely before adding oil. A single drop of bearing oil on a wet bearing just dilutes the oil. Patience here pays off in bearing life.
How to check tires, wheels, shocks, and suspension
Check tires and shocks before every full session. A leaking shock or a loose wheel nut takes 30 seconds to catch before a run and 30 minutes to deal with after a crash caused by it.
Tire and wheel inspection:
- Press your thumb into each tire to feel for cuts, tears, or delamination from the rim
- Pick out embedded gravel or debris with a pick or small screwdriver
- Check wheel nuts with the appropriate nut driver; finger-tight nuts back off within one run
- Inspect foam inserts for compression or crumbling — collapsed foam kills cornering feel
- Replace tires when the tread is worn flat or the compound has hardened
Shock inspection and rebuild steps:
- Wipe the shock body and shaft clean.
- Compress the shock slowly and watch for oil seeping past the shaft seal — any weeping means a rebuild is due.
- Unscrew the shock cap, drain the old oil, and inspect the o-ring at the cap and shaft.
- Replace o-rings every rebuild; reusing old o-rings is the most common cause of a shock that leaks again immediately.
- Refill with the correct viscosity shock oil (thinner oil for smoother tracks, thicker for rough terrain).
- Bleed air by compressing the shock with the cap loose before sealing.
Racers typically rebuild shocks every 10–15 runs under competition conditions; casual bashers can go longer but should rebuild at least once a season.
Suspension geometry: Check toe and camber by eye or with a simple setup board. Bent suspension arms change handling subtly before they fail visibly. If the car pulls to one side on a flat surface, check for a bent arm or a loose turnbuckle before assuming the servo is at fault.
Pro Tip: Keep a spare set of shock o-rings in your field bag. A shock rebuild at the track takes five minutes with the right parts. Without them, you’re done for the day.
Post-run checklist and a simple maintenance schedule
Do the after-run checklist every single time. Weekly and monthly tasks scale with how often you run — a car that goes out twice a week needs more frequent attention than one used on weekends.
After each run (5 minutes):
- Remove the battery and store it at storage charge.
- Blow out the chassis with compressed air.
- Check all visible screws with a hex driver.
- Inspect tires and wheel nuts.
- Wipe electronics with a dry cloth.
- Note any unusual sounds, smells, or handling changes in a simple log.
Weekly tasks:
- Detailed drivetrain inspection (gears, diffs, drive cups)
- Battery health check (voltage per cell, physical condition)
- Re-lubricate steering pivots and hinge pins
- Check bearing smoothness on all four wheels
Monthly tasks:
- Full diff teardown and re-grease
- Shock rebuild or oil inspection
- Brushed motor commutator service
- Replace any worn o-rings, body clips, or stripped screws
- Full electronics inspection including solder joints
Beginner checklists stress cleaning after every run and performing quick inspections of tires, shocks, and batteries to reduce breakdowns and spot loose screws early. Experienced hobbyists and racers extend this into run-count schedules: diff greasing on a regular schedule, shock rebuilds every 10–15 runs under racing use.
Pro Tip: A pocket notebook or a notes app works fine as a maintenance log. Write the date, run conditions, and anything you noticed. After three months, patterns emerge — you’ll know exactly which component needs attention before it fails.
What tools and supplies belong in your RC maintenance kit
Everything else is useful but optional until you need it.
Core tools:
- Hex drivers: 1.5mm, 2mm, 2.5mm, 3mm (ball-end versions speed up awkward angles)
- Nut drivers: 5mm, 5.5mm, 7mm for wheel nuts and body post nuts
- Phillips and flathead screwdrivers (small sizes)
- Needle-nose pliers and body clip pliers
- Shock pliers for shock caps
- Multimeter (for battery voltage and connector checks)
- LiPo-capable balance charger
Specialty tools:
- Commutator stick (brushed motor users)
- Bearing puller or press (for replacing bearings cleanly)
- Gear mesh gauge or feeler gauge
- Turnbuckle wrench for suspension adjustments
- Thread locker (blue/medium strength for screws that back out; avoid permanent red on anything you’ll remove)
Consumables to keep stocked:
- Spare screws in common sizes (M3 is the most common in 1:10 scale)
- O-ring assortment (shock and diff sizes for your specific car)
- Shock oil in two viscosities
- Bearing oil and white lithium grease
- Diff grease (moly or silicone-based)
- Spare body clips and wheel nuts
- Foam tire inserts
- Isopropyl alcohol (90%+ for cleaning)
- Microfiber cloths
| Tool Category | Key Items | Priority |
|---|---|---|
| Drivers | 1.5–3mm hex, 5–7mm nut drivers | Essential |
| Measuring | Multimeter, feeler gauge | Essential |
| Specialty | Comm stick, bearing puller | Brushed/racer |
| Consumables | O-rings, shock oil, bearing oil | Always stock |
| Safety | LiPo bag, fireproof surface | Non-negotiable |
How to set up an RC Safety Circle for safer sessions
The Safety Circle is a simple perimeter protocol that prevents spectator and boundary incidents before they happen. A five-minute Safety Circle setup — scout, place cones, mark zones, establish command position, final walk — and a minimum 10-foot diameter for ground vehicles reduces spectator confusion and improves safety. When kids are present, the visual boundary creates an automatic habit: stay outside the cones.
Five-step Safety Circle setup:
- Scout (1 min): Walk the area and identify hazards — slopes, foot traffic paths, blind corners, and hard surfaces near the run zone.
- Place cones (1 min): Set 4–8 bright orange cones (12–18 inch height) in a circle with at least a 10-foot diameter. Larger vehicles or faster speeds need a wider perimeter.
- Mark zones (1 min): Designate a staging area (where the car is prepped and batteries are swapped) and a spectator zone clearly outside the cone line.
- Set command position (1 min): Stand at a fixed point inside or at the edge of the circle where you have a clear sightline to the full run area.
- Final walk (1 min): Walk the perimeter once, confirm cones are visible from all angles, and brief any children or spectators on the boundary rule.
Starter Safety Circle kit:
- 4–8 orange traffic cones (12–18 inch)
- Marking flags for staging and spectator zones
- Basic first-aid kit
- A designated battery-staging mat (silicone or ceramic tile)
Advanced options: Use inner and outer circles for high-speed runs — the inner circle is the active run zone, the outer is the spectator buffer. Assign a boundary monitor (a second adult) for crowded parks. Keep a short, polite script ready for passersby: “We’re running RC cars in this area — please stay outside the orange cones.”
Pro Tip: Integrate the Safety Circle with your after-run checklist. When the car comes in, it goes to the staging zone inside the circle for inspection and battery swap — never handed to a child while the motor is still warm or the ESC is armed.
Diagnosing common RC problems at the field
Isolate power first, then work outward: battery, then ESC and receiver, then motor and drivetrain. Most field failures trace back to one of those three areas.
Car won’t start
- Check battery voltage with a multimeter or charger — a pack below the ESC’s low-voltage cutoff won’t arm.
- Verify connector polarity and check for bent pins.
- Run through the ESC arming sequence (throttle to neutral, power on, wait for tones).
- Check failsafe settings — a receiver that lost its bind won’t pass throttle signal.
- Swap the receiver channel if the ESC shows signal but the motor doesn’t respond.
Stuttering or power drops
- Battery sag: Voltage drops under load but recovers at rest. The pack is worn or the C-rating is too low for the motor.
- Poor connector contact: Wiggle the main connector while the car is stationary. Any flicker means the connector needs cleaning or replacement.
- Overheating ESC: An ESC that cuts out after a few minutes and recovers after cooling is thermal throttling. Check for blocked airflow or a motor drawing too much current.
Overheating motor or ESC
Stop immediately when you smell burning or the motor is too hot to touch for more than two seconds. Common causes: gearing too tall for the terrain, a wheel binding from a bent axle or debris, or running in deep mud that loads the drivetrain beyond the motor’s rating. Drop to a smaller pinion gear, clear any binding, and let the system cool for five minutes before running again.
Pro Tip: Carry a small infrared thermometer in your field bag. A 10-second temp check on the motor and ESC after each run tells you whether your gearing is safe before you push harder.
What most RC maintenance guides get wrong
Most RC maintenance content focuses on the car and ignores the operator’s habits. The car doesn’t fail in isolation — it fails because someone skipped the after-run checklist twice, stored a LiPo fully charged for a month, or ran a worn pinion until the spur stripped.
The real leverage in remote control car care isn’t knowing how to rebuild a diff. It’s building the five-minute after-run habit so the diff never needs an emergency rebuild at the track. Experienced racers don’t spend more time on maintenance than beginners — they spend it at the right time, which is immediately after a run when problems are easiest to catch and fix.
Battery discipline deserves more attention than it gets. A LiPo stored at full charge for weeks loses capacity permanently. A pack stored at 3.8V per cell lasts years. That’s not a technical skill; it’s a habit that costs nothing and saves the price of a replacement pack every season.
The Safety Circle concept is underused outside of organized racing. Running a fast RC car in a park without a defined perimeter is genuinely risky for bystanders, especially children. Two minutes and four cones change that completely. If you run with kids around, this is the single highest-impact safety step you can take — more than any piece of protective gear on the car itself.
Toylandeu™ has the RC cars and starter gear you need
If you’re building your first maintenance kit or looking for a car that’s designed to take abuse and keep running, Toylandeu™ carries a range of RC vehicles built for exactly that. The gesture-controlled stunt car is a strong beginner pick — low-maintenance electronics, 360° stunt capability, and a design that holds up to the kind of running that tests every tip in this guide.

For families and younger drivers, the mini off-road SUV is built tough, ships with everything needed to get started, and is easy to clean and inspect after runs. Toylandeu™ ships internationally with free worldwide shipping across its catalog of over 30,000 products, so replacement parts and starter kits are never far away. Browse the full RC range at Toylandeu and pick the model that fits your skill level and maintenance commitment.
Sources
- Maintenance Guide - HPI Racing
- The Ultimate Guide to RC Car LiPo Battery Safety: Handling, Charging, and Disposal - The best place for RC cars in the UK & Europe
- The Ultimate Guide To Maintaining Your Rc Car | ShunAuto
FAQ
How do I maintain my RC car?
Clean the car after every run using a soft brush and compressed air, check and tighten screws, inspect tires and shocks, and store the battery at the correct charge level. Follow an after-run checklist every session and perform deeper drivetrain and shock maintenance on a weekly or monthly schedule based on usage.
Is WD-40 good for RC cars?
No. WD-40 is a water-displacing spray, not a long-term lubricant. It washes out existing grease in bearings and motor internals and evaporates quickly, accelerating wear. Use hobby-grade bearing oil for bearings and white lithium grease for gear meshes instead.
How do I maintain a fast RC car?
Fast RC cars generate more heat and stress, so check gear mesh and motor temperature after every run, re-grease diffs every 20–25 runs, and rebuild shocks every 10–15 runs under hard use. Use a balance charger for LiPo packs and monitor ESC temperature to catch overheating before it causes damage.
What are the maintenance tips for a 4x4 RC car?
A 4WD RC car has front and rear diffs, additional driveshafts, and more bearings to service. Inspect all four diffs for leaks and re-grease on the same run-count schedule, check CVDs and drive cups at all four corners, and verify that front and rear drivetrains spin freely without binding before each session.
Recommended
- RC Toy Buying Guide 2025 — RTR, ARR, ARF & TX/RX – ToylandEU
- RC Ultimate 1:16 Brushless 4WD RC Car - Thrilling Off-Road Fun for Everyone ToylandEU™
- RC Ultimate 4WD RC Racing Car with Hydraulic Shocks - Ready for Action! ToylandEU
- RC Ultimate 1:24 Scale Drift RC Car with Custom Tires & Mini-Cones Fun ToylandEU