

STEM toy setup workflow: step-by-step guide for parents
- Proper space organization and dedicated zones enhance STEM toy learning and reduce frustration.
- Consistent setup workflows, safety checks, and documentation boost engagement and skill development.
- Regular challenges, rotation, and reflection foster sustained interest and deeper understanding.
STEM toys spark genuine excitement in kids, but that excitement fades fast when setup turns into a scramble. Tangled wires, missing pieces, and unclear instructions can turn a promising learning session into a frustrated mess. Research confirms that dedicated zones and guided play are key to making STEM toys work as real educational tools, not just expensive clutter. Whether you’re a parent running a homeschool session or an educator managing a classroom activity corner, having a repeatable workflow changes everything. This guide walks you through every stage, from preparing your space to troubleshooting problems, so STEM play delivers actual learning value every single time.
Table of Contents
- Preparing your STEM toy area
- Tools, materials, and setup requirements
- Step-by-step setup workflow
- Troubleshooting and sustaining engagement
- What most parents and educators miss in STEM toy setup
- Explore more STEM learning kits and creative toys
- Frequently asked questions
Key Takeaways
| Point | Details |
|---|---|
| Organized toy zones | Setting up dedicated STEM play areas prevents chaos and makes learning more effective. |
| Stepwise workflow | Using a structured plan-build-test-iterate workflow enhances creativity and problem-solving. |
| Troubleshooting skills | Teaching kids how to troubleshoot and fix setups encourages resilience and deeper understanding. |
| Engagement strategies | Weekly mini-challenges and toy rotation keep kids interested and learning. |
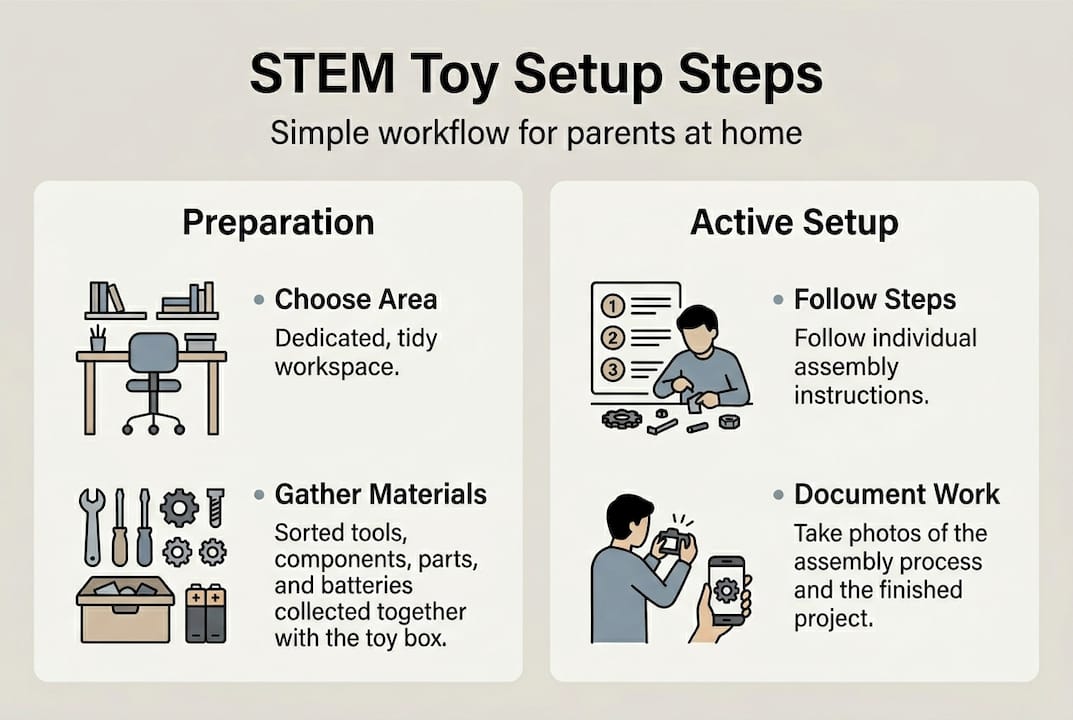
Preparing your STEM toy area
The single biggest mistake parents and educators make is treating STEM toy setup as an afterthought. You pull out the kit, clear a corner of the table, and hope for the best. That approach rarely works. A structured space signals to kids that what’s happening here is intentional and worth their focus.
Start by choosing a location with good natural or overhead lighting, enough floor or table space for the activity, and a sightline that allows easy adult supervision. A dedicated corner of a living room, a classroom station, or even a garage workbench works well. The key is consistency. When kids return to the same space, their brains shift into “build mode” faster.
Once you have a location, divide it into three zones:
- Science zone: For experiments, observation trays, and measurement tools
- Engineering zone: For building kits, robotics, and mechanical toys
- Creative zone: For open-ended art-meets-STEM projects like Montessori drawing or circuit crafts
This zoning approach, supported by STEM playground methodologies, helps children self-direct and reduces the time you spend redirecting them.
For storage, color-coded bins are your best friend. Assign one color per zone and label every bin at the child’s eye level. Mounting boards, where you hang frequently used tools on pegboards, keep surfaces clear and make cleanup faster.
Pro Tip: Use a different bin color for each age group if you have multiple children. Red for ages 3 to 5, blue for 6 to 9, and green for 10 and up. It eliminates the “that’s mine” argument and keeps tiny parts away from younger siblings.
Safety note: Always keep small components, magnets, and lithium batteries stored out of reach of children under 3. Run a quick safety checklist before every session: clear the floor of tripping hazards, confirm adult supervision is available, and verify that all sharp tools are stored separately.
For setting up low-screen STEM play that holds attention, the physical environment matters as much as the toy itself. Pair your space setup with sustainable STEM toy choices that grow with your child to get the most from your investment.
| Age group | Recommended activity type | Key safety consideration |
|---|---|---|
| 3 to 5 | Sorting, stacking, basic circuits | No small parts, soft edges |
| 6 to 9 | Simple robotics, science kits | Adult supervision for tools |
| 10 and up | Advanced builds, coding kits | Battery and soldering safety |
Tools, materials, and setup requirements
After choosing your STEM toy area, gather the tools and materials needed for a smooth setup workflow. Walking into a session underprepared is the second biggest reason STEM activities fall apart.
The
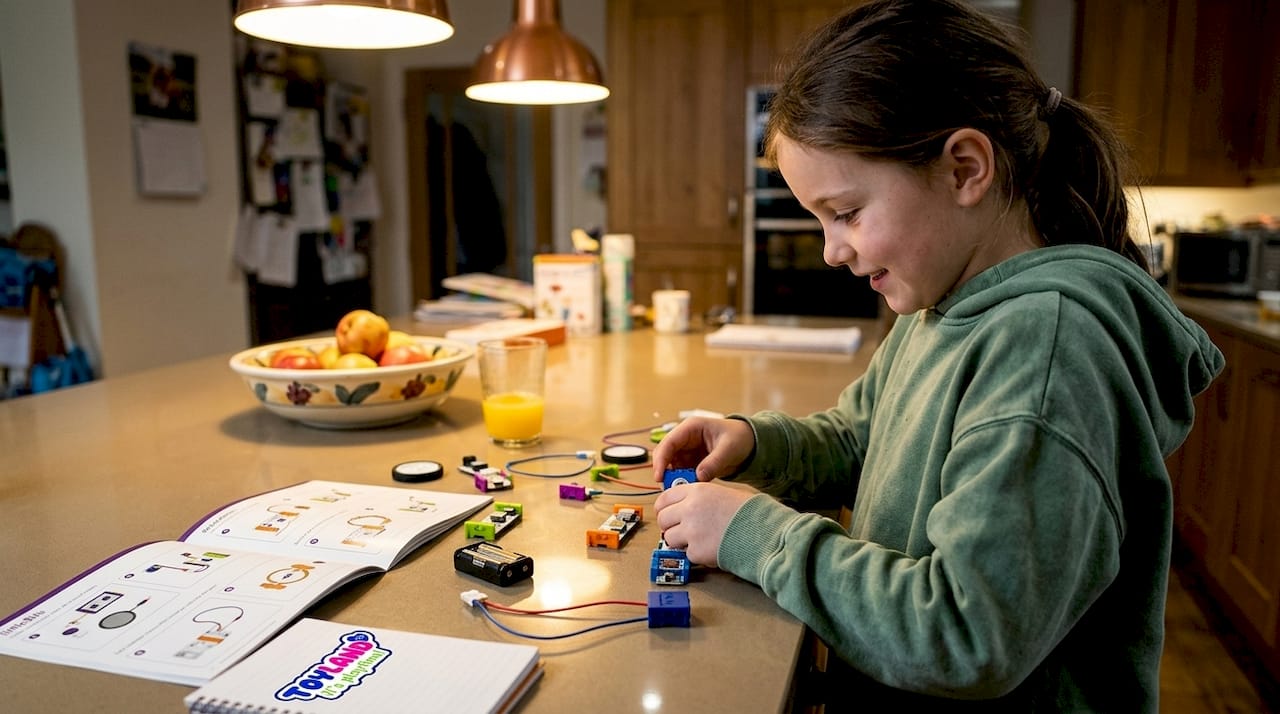
littleBits STEAM kits are a strong example of how color-coded electronic modules and mounting boards simplify setup dramatically. Each module snaps together magnetically, so even young children can assemble circuits without adult help after the first guided session.
Here’s a practical breakdown of what you need by category:
| Tool or material | Purpose | Age group |
|---|---|---|
| Color-coded bins | Organized storage by zone | All ages |
| Mounting pegboard | Hang tools, keep surfaces clear | 6 and up |
| Magnetic connectors | Quick assembly for circuit kits | 6 and up |
| Labeled zip bags | Store small components safely | All ages |
| Timer or visual clock | Manage activity time blocks | All ages |
| Sketch pad and pencils | Document designs and outcomes | 8 and up |
Pro Tip: Invest in stackable, transparent storage bins rather than opaque boxes. When kids can see what’s inside without opening every container, setup time drops by a third and independent exploration goes up.
For an age-appropriate STEM toy guide that matches materials to developmental stages, check the full breakdown on ToylandEU’s blog. And if you’re thinking long-term, pairing the right tools with evolving STEM toy skills means your setup grows with your child instead of becoming obsolete.
Here are the core setup requirements organized by toy type:
- Science toys: Clear workspace, measurement tools, water-safe surface or tray, safety goggles for experiments
- Engineering toys: Flat building surface, sorted component bins, instruction cards at eye level, spare connectors
- Creative STEM toys: Art-safe table covering, color-sorted supplies, open wall or board for displaying finished work
Having these materials ready before the child sits down is the difference between a session that launches in two minutes and one that loses momentum before it starts.
Step-by-step setup workflow
With tools in hand, follow these workflow steps for effective STEM toy setups. The most reliable framework is the Engineering Design Process, which moves through five stages: plan, build, test, iterate, and reflect. It works for a 6-year-old stacking magnetic tiles and a 12-year-old programming a robot.
For littleBits STEAM setups, the workflow is color-driven: blue power modules first, then green input modules, then orange or red output modules. Following that order prevents 90% of connection errors before they happen.
Here’s the full numbered workflow:
- Identify the goal: What is the child building or testing today? Write it on a card or whiteboard.
- Assemble components: Pull only the pieces needed for this session. Return extras to storage.
- Test the setup: Before handing it to the child, do a quick adult check. Does it power on? Are connections secure?
- Start the activity: Let the child lead. Resist the urge to fix things immediately.
- Document progress: Photos, sketches, or a simple checklist work well for tracking outcomes.
Pro Tip: For homeschool families, that documentation step is gold. A photo of a completed circuit with a one-sentence caption becomes a portfolio entry in under two minutes.
| Workflow type | Structure | Best for |
|---|---|---|
| Guided challenge | Adult sets goal, child executes | New concepts, younger kids |
| Open-ended play | Child sets goal, adult supports | Creative exploration, older kids |
Weekly mini-challenges, like “build something that moves” or “make a circuit that lights up when you clap,” sustain engagement far better than one-off sessions. For hands-on robotics, the tactile robotics kit setup guide offers detailed workflow steps. And for kits that last, repairable STEM toy tips help you get more sessions from every purchase.
Troubleshooting and sustaining engagement
After initial setup, address troubleshooting and build lasting engagement through expert strategies. Even with a perfect workflow, things go wrong. A motor doesn’t spin. A circuit won’t light up. A child loses interest after ten minutes. These are normal, and each one has a fix.
For technical issues, checking power, connections, and assembly order resolves the vast majority of STEM kit problems. Here’s a quick-reference list:
- No power: Check battery orientation, confirm the power switch is on, try a fresh battery
- Loose connections: Press all modules firmly together, look for bent pins or debris in connectors
- Wrong output: Recheck assembly order against the instruction card, swap input and output modules if needed
- Child disengagement: Introduce a constraint, like “now build it using only five pieces,” to re-spark problem-solving
- Frustration meltdown: Break the task into a smaller sub-goal and celebrate that win first
Pro Tip: Rotate your toy selection every two to three weeks. Screen-minimized STEM play tips show that novelty alone re-engages children who have plateaued with a familiar kit.
Open-ended questions and weekly mini-challenges are proven to foster critical thinking and sustained engagement over time. Instead of asking “did it work?”, try “what would happen if you changed this part?” That one shift moves kids from passive testers to active designers.
Portfolio note: Keep a simple binder or digital folder with dated photos of each completed activity. Over a school year, this becomes a powerful record of hands-on learning, especially useful for homeschool families presenting evidence of STEM education to oversight bodies.
For deeper guidance on interactive STEM toy troubleshooting and enhancing STEM toy safety in 2026, ToylandEU’s blog covers both topics in detail.
What most parents and educators miss in STEM toy setup
Here’s the uncomfortable truth: most STEM toy setups are surface-level. Parents buy the kit, kids play with it twice, and it ends up in a closet. That’s not a toy problem. It’s a workflow problem.
The Engineering Design Process and documentation are what separate genuine learning from expensive playtime. When you build in reflection, when you ask a child to explain what worked and what didn’t, you’re activating the same cognitive loop that engineers use professionally.
Consistency matters more than variety. A child who works through the same robotics kit every week for a month, iterating on their design each time, learns more than a child who tries five different kits once each. Weekly rhythm, structured reflection, and small challenges compound over time. That’s how STEM play builds real skills. Pair that habit with growing STEM skills resources that match your child’s current level, and you’ll see measurable progress within weeks.
Explore more STEM learning kits and creative toys
If you’re looking for STEM kits and creative toys that support your workflow, ToylandEU has a wide range of options ready to ship worldwide. Whether you need something hands-on and physical or a kit that grows with your child’s skills, the catalog covers every age and interest.
For kids who love movement and engineering, the gesture-controlled STEM car turns hand motions into driving commands, a perfect fit for the engineering zone. The engineering excavator bulldozer set brings real construction mechanics to small hands. And for creative STEM play, the Montessori drawing kit blends structured art with open-ended exploration. All orders ship free worldwide.
Frequently asked questions
What is the best workflow for setting up STEM toys for young children?
The best workflow is to create a dedicated play zone, organize tools and materials by category, follow a step-by-step setup process, and match activities to the child’s age and skill level. Consistency across sessions builds confidence and reduces setup friction over time.
How do I troubleshoot power or connection issues in STEM toy kits?
Start by checking all power sources and battery orientation, then confirm that wiring connections are fully seated and that assembly order follows manufacturer guidelines. Most issues resolve by reconnecting modules or swapping in a fresh battery.
What are some strategies for sustaining engagement with STEM toys?
Rotate toys every two to three weeks, introduce weekly mini-challenges with a specific constraint or goal, and ask open-ended questions that push kids to think beyond whether something worked or failed.
Can STEM toy setups contribute to homeschool portfolios?
Absolutely. Documenting setup processes and outcomes with dated photos or sketches creates concrete evidence of hands-on STEM learning that works well in homeschool portfolio reviews.
Recommended
- Tactile Robotics Kits: Eco STEM & Screenless Toys That Grow – ToylandEU
- Screen-Minimized STEM Play: Tactile, Sustainable Toys That Grow – ToylandEU
- Repairable STEM Toys: Buy Once, Play Longer – ToylandEU
- How to Choose the Perfect STEM Learning Toys for Every Age Group (0-12 – ToylandEU
- 3D Scanning Checklist: Ensure Accurate Prototypes & Parts